
Introduction to Garlic Swirl Rolls
Why Garlic Swirl Rolls Are the Perfect Homemade Treat
Have you ever craved a comforting, yet sophisticated, baked good that fills your home with a delightful aroma? Garlic swirl rolls are your answer! These rolls are not only a crowd-pleaser at dinner parties but also a soul-soothing snack when you need something indulgent. Picture this: a soft, pillowy roll, bursting with garlicky goodness, fresh herbs, and a sprinkle of Parmesan. Is there really anything more delectable?
Making garlic swirl rolls at home is an adventure filled with fragrant ingredients and a bit of kitchen magic. The best part? They’re surprisingly easy to whip up. Even if you’re a novice baker, this recipe guides you step-by-step, transforming simple components into a gourmet dish. Plus, homemade rolls not only taste better but also allow you to control the ingredients, ensuring you use quality, fresh elements.
If you're intrigued but not quite convinced, consider this: recipes like these encourage you to gather friends and family, igniting conversations and laughter around the table. Now, doesn’t that sound like a treat worth trying? For step-by-step guidance that will transform your kitchen into a bakery, keep reading for our delicious garlic-swirled creation!
Ingredients for Garlic Swirl Rolls
Creating the perfect garlic swirl rolls starts with a handful of simple yet delightful ingredients. Here’s what you’ll need:
For the dough
- Cooking spray: To keep things from sticking.
- 4 to 4 ¼ cups all-purpose flour: Plus more for rolling. This is the foundation of your rolls.
- 2 tablespoons granulated sugar: Just a touch of sweetness balances the garlic flavor.
- 1 (¼-ounce) packet active dry yeast (2 ¼ teaspoons): Essential for that soft, fluffy texture.
- 1 ½ teaspoons kosher salt: A key ingredient for flavor.
- 1 cup warm water: Activates the yeast.
- ¼ cup olive oil: For richness and moisture.
- 2 large eggs: Helps bind the dough.
- 1 large egg yolk: Adds richness and color.
For the filling
- 1 ½ sticks (¾ cup) unsalted butter: The gooey base for your filling.
- 8 cloves garlic: The star of this recipe, minced to perfection.
- ½ bunch fresh parsley: For a fresh, vibrant touch.
- 1 ounce Parmesan cheese, finely grated (about ½ cup): Adds a savory punch.
- ½ teaspoon kosher salt: Enhances all the flavors.
- ¼ teaspoon freshly ground black pepper: A hint of spice.
Each ingredient plays a crucial role in creating those mouthwatering garlic swirl rolls that are perfect for any gathering. Happy baking!
For more on the benefits of using fresh ingredients, check out Healthline.
Preparing Garlic Swirl Rolls
Making garlic swirl rolls is a delightful journey that ends with a warm, buttery treat. Follow these detailed steps to ensure your rolls come out perfectly fluffy and flavorful!
Prepare the baking dish and soften the butter
Start by greasing a 9x13-inch baking dish with some cooking spray. This helps prevent sticking and makes for easier roll removal later. Next, take 1 ½ sticks (¾ cup) of unsalted butter for your filling and place it in a medium bowl. Let it sit at room temperature to soften while you get started on the dough. Pro tip: Softened butter mixes better with garlic and herbs, ensuring every bite bursts with flavor!
Make the dough
In the bowl of your stand mixer fitted with the hook attachment (or a large mixing bowl if you're kneading by hand), combine 4 cups of all-purpose flour, 2 tablespoons of sugar, 1 packet of active dry yeast, and 1 ½ teaspoons of kosher salt. Whisk these dry ingredients together. In a separate medium bowl, whisk together 1 cup of warm water, ¼ cup of olive oil, and the eggs until well blended. Gradually add this mixture to your dry ingredients and mix on low speed. Once it forms a cohesive ball of dough, increase the speed and knead for about 7 to 8 minutes.
Let the dough rise
Once your dough is smooth, transfer it to a greased bowl and cover it tightly with plastic wrap. Place it in a warm spot to rise until it nearly doubles in size, around 1 ½ hours. While the dough is rising, it’s a perfect time to prepare your filling!
Create the filling
Mix together the softened butter, freshly minced 8 garlic cloves, finely chopped ½ bunch of parsley, and 1 ounce of grated Parmesan cheese in your bowl. Add ½ teaspoon of kosher salt and ¼ teaspoon of black pepper. Use a fork to really mash it all together, creating a fragrant filling that will make your rolls irresistible.
Roll and cut the dough
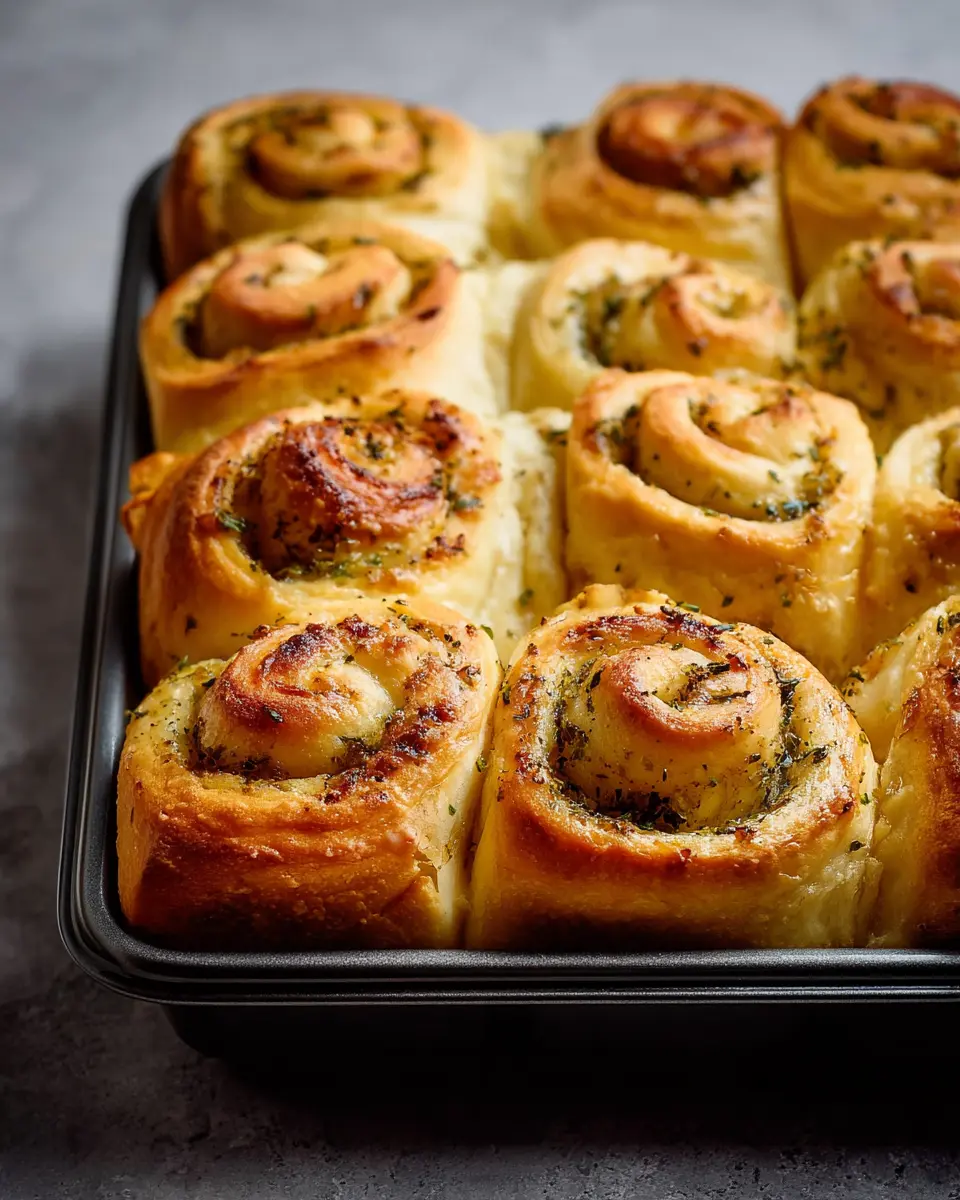
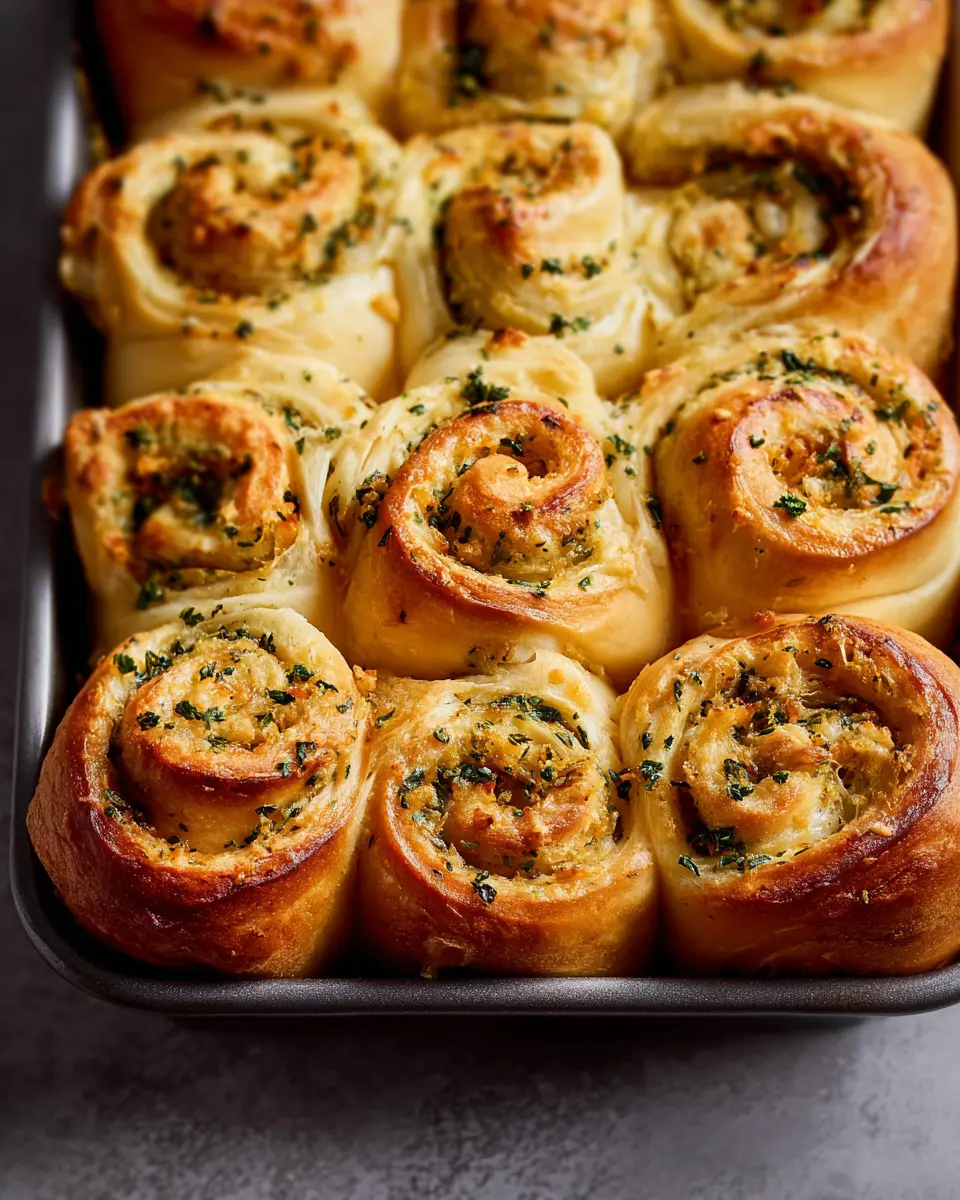
Once the dough has risen, punch it down gently and transfer it to a floured surface. Roll it into a rectangle measuring approximately 24x10 inches. Spread half of the garlic filling evenly over the dough. Roll the dough tightly from the long side, sealing the edge by pinching it together. Use a sharp knife or unflavored dental floss to cut the log into 15 pieces.
Let the rolls rise again
Arrange the garlic swirl rolls cut-side up in your baking dish, ensuring they have a bit of space to grow. Cover them loosely with plastic wrap and let them rise again for about 25 minutes. During this time, preheat your oven to 350°F.
Bake the garlic swirl rolls
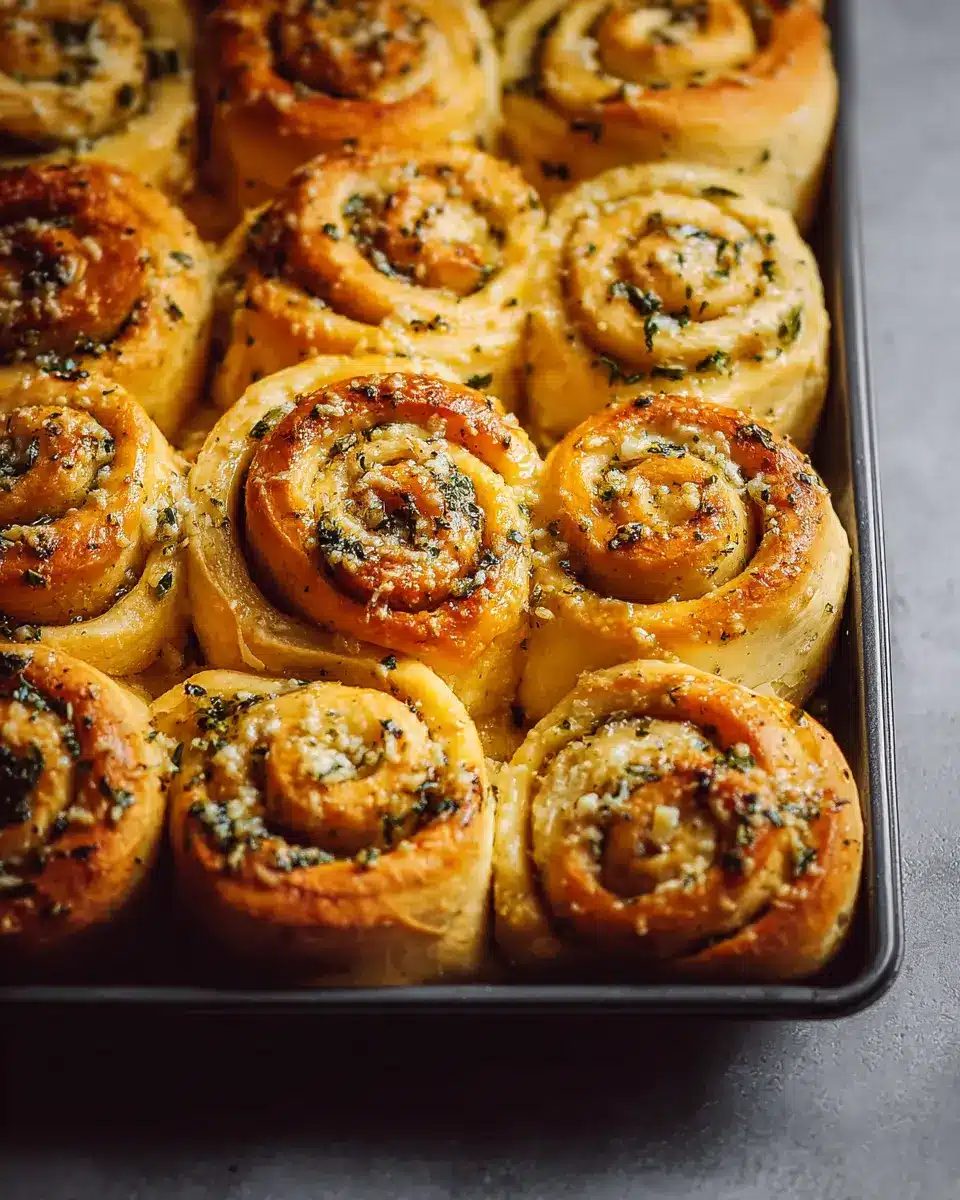
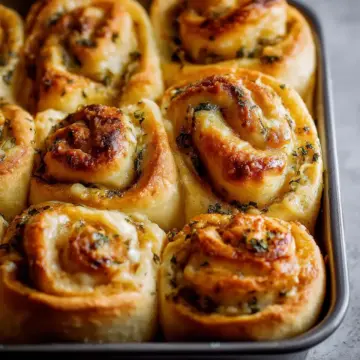
When the rolls have puffed up, remove the plastic wrap and pop them into the oven. Bake until they’re golden-brown and a toothpick inserted comes out clean, about 30 to 35 minutes. As soon as they’re out, spread the remaining butter mixture over the rolls, allowing it to melt into each crevice. Your kitchen will smell heavenly, and soon enough, you'll have a plate full of warm garlic swirl rolls ready to enjoy!
For additional tips and variations, feel free to explore resources like The Kitchn that offer more delicious ideas! Enjoy your baking adventure!
Variations on Garlic Swirl Rolls
Garlic swirl rolls are a delightful treat, but why not elevate them further? Here are some delicious variations that will make your taste buds dance!
Cheesy Garlic Swirl Rolls
For a gooey twist, sprinkle shredded mozzarella or cheddar cheese atop your garlic filling before rolling. As the rolls bake, the cheese melts and creates a luscious, savory layer that pairs wonderfully with the garlic. Serve these cheesy garlic swirl rolls warm, and watch them disappear in no time!
Herb-Infused Garlic Rolls
Add a fragrant layer of fresh herbs like rosemary, thyme, or oregano to the filling. Simply chop the herbs finely and mix them into the garlic butter for a refreshing twist. These herb-infused garlic rolls are perfect for complementing a range of dishes or simply enjoying on their own.
Feel free to experiment with these variations and find your perfect garlic swirl rolls combination!
Cooking notes for Garlic Swirl Rolls
Tips for achieving the perfect dough
To create the ideal dough for your garlic swirl rolls, make sure your water is warm but not hot—ideally around 110°F to activate the yeast without killing it. Knead until the dough is smooth and elastic; it should spring back when pressed. If your dough is too sticky, don’t hesitate to sprinkle in additional flour, one tablespoon at a time. Patience is key—allow it to rise in a warm, draft-free area for the best results.
Secrets to flavorful filling
For a truly delicious filling, use fresh ingredients. Mince your garlic finely to ensure it blends well with the butter, allowing the flavor to permeate every roll. Don’t skip the fresh parsley; it adds a vibrant touch. Mixing in freshly grated Parmesan cheese will elevate your garlic swirl rolls, offering that cheesy indulgence that makes them irresistible. Combine these ingredients thoroughly for a homogeneous mixture, ensuring every bite is bursting with flavor!
For more tips on dough care and filling ideas, check out sources like Sally's Baking Addiction and America's Test Kitchen for expert insights.
Serving Suggestions for Garlic-Swirl Rolls
Pairing with Soups and Salads
Garlic-swirled rolls are a wonderful complement to your favorite soups and salads. Imagine enjoying a warm, buttery roll alongside a hearty tomato basil soup or a crisp Caesar salad. The savory garlic filling enhances the flavors of light dishes. Try pairing them with a creamy broccoli cheddar soup or a refreshing spinach salad for a satisfying meal. If you're feeling adventurous, explore different soup recipes to see which one becomes your new favorite duo!
Making it a Meal with Spreads
You can elevate garlic swirl rolls by serving them with delightful spreads. Try a rich hummus or a tangy tzatziki to create a simple yet impressive appetizer. A rustic olive tapenade can add a Mediterranean twist that beautifully complements the garlic flavors. If you want something heartier, consider a spread made from roasted red peppers and cream cheese. These additions can turn your rolls into a delightful meal that’s perfect for sharing or savoring on your own. Explore Easy Hummus Recipes for more ideas to enhance your dining experience!
Time Details for Garlic Swirl Rolls
Preparation Time
Getting started is a breeze! You’ll need about 20 minutes to prep your ingredients and get the dough ready for its first rise.
Baking Time
The real magic happens in the oven. Bake your delicious garlic swirl rolls for 30 to 35 minutes until they’re golden brown and irresistible.
Total Time
In just about 2 hours (including rising time), you can have these tempting rolls fresh out of the oven, ready to impress your friends and family. Perfect for gatherings or just a cozy night in!
Want to dive into the world of bread-making? Check out this guide from King Arthur Baking for some fantastic tips and techniques!
Nutritional Information for Garlic Swirl Rolls
Curious about the goodness packed into these delicious garlic swirl rolls? Here's a quick snap of their nutritional profile just for you!
Calories
Each roll contains approximately 200 calories, making them a satisfying treat without breaking your calorie bank.
Protein
You'll find about 4 grams of protein per roll, thanks to the eggs and cheese, which help keep you feeling full and energized throughout the day.
Sodium
Each roll has around 300 mg of sodium. While it brings out the flavor, be mindful if you're watching your salt intake!
For a detailed breakdown of nutrients or to explore more recipes, check out USDA FoodData Central for comprehensive information. Enjoy your baking!
FAQs about Garlic Swirl Rolls
Can I use whole wheat flour in the dough?
Absolutely! You can substitute up to half of the all-purpose flour with whole wheat flour for a healthier twist. Just keep in mind that whole wheat flour may result in a denser roll, so adjust the hydration slightly if needed.
How do I store leftover rolls?
To maintain the freshness of your garlic swirl rolls, store them in an airtight container at room temperature for up to three days. If you prefer them warmed, simply pop them in the oven for a few minutes before serving. Need tips on maximizing flavor? Try adding a dash of extra garlic butter!
Can I freeze garlic swirl rolls?
Definitely! Freezing your garlic swirl rolls is a great way to prepare for future cravings. After baking, let them cool completely, then wrap each roll tightly in plastic wrap and place them in a freezer-safe bag. They can be frozen for up to three months. When you’re ready to enjoy, just reheat in the oven at 350°F until warmed through.
For more tips on bread storage, check out this resource from The Kitchn.
Conclusion on Garlic-Swirl Rolls
Why You Should Try Making These Rolls at Home
If you’re looking for a delightful baking project that’s sure to impress, garlic swirl rolls are your answer! Not only are they fluffy and flavorful, but the aroma that fills your kitchen while baking is truly irresistible. Making these at home allows you to customize your ingredients and enjoy them fresh out of the oven—perfect for dinner parties or a cozy night in. Plus, who can resist the allure of warm, garlicky goodness? Dive in, and let the hearty flavor lift your spirits!
For more baking tips and recipes, check out sites like Bon Appétit and Serious Eats to enhance your culinary adventures!
Garlic-Swirl Rolls
Equipment
- Stand Mixer
- 9x13 inch baking dish
- Rolling pin
- sharp knife
Ingredients
For the dough
- 4 cups all-purpose flour plus more for rolling
- 2 tablespoons granulated sugar
- 1 packet active dry yeast (2 ¼ teaspoons)
- 1.5 teaspoons kosher salt
- 1 cup warm water
- 0.25 cup olive oil
- 2 large eggs
- 1 large egg yolk
For the filling
- 1.5 sticks unsalted butter (¾ cup)
- 8 cloves garlic
- 0.5 bunch fresh parsley
- 1 ounce Parmesan cheese finely grated (about ½ cup)
- 0.5 teaspoon kosher salt
- 0.25 teaspoon freshly ground black pepper
Instructions
Making Garlic-Swirl Rolls
- Coat a 9x13-inch baking dish with cooking spray. Place 1 ½ sticks unsalted butter for the filling in a medium bowl and let sit at room temperature to soften while you make the dough.
- Make the dough: Place 4 cups of the all-purpose flour, 2 tablespoons granulated sugar, 1 packet active dry yeast, and 1 ½ teaspoons kosher salt in the bowl of a stand mixer fitted with the hook attachment and whisk to combine.
- Place 1 cup warm water, ¼ cup olive oil, 2 large eggs, and 1 large egg yolk in a medium bowl and whisk to combine. Turn the mixer speed on to low and slowly pour in the egg mixture. Increase the speed to medium-low and knead until the dough is smooth, soft, and forms a ball, 7 to 8 minutes.
- Gently remove the dough from the bowl and coat the bowl in cooking spray. Tightly cover the bowl in plastic wrap and let rise in a warm place until nearly doubled in size, about 1 ½ hours.
- Make the filling: Add minced 8 garlic cloves, finely chopped ½ bunch fresh parsley leaves, and finely grated 1 ounce Parmesan cheese to the bowl of softened butter. Add ½ teaspoon kosher salt and ¼ teaspoon black pepper and stir to combine.
- When the dough is ready, punch it down and transfer onto a lightly floured work surface. Roll the dough into a 24x10-inch rectangle (about ¼-inch thick).
- Spread half of the filling onto the dough. Starting at the long end closest to you, roll the dough up tightly into a log and pinch the seam together.
- Cut the log into 15 pieces and arrange them cut-side up in the baking dish. Loosely cover in plastic wrap and let rise at room temperature for 25 minutes.
- Preheat the oven to 350°F. Uncover and bake until puffed, golden-brown, for 30 to 35 minutes.
- Spread the remaining butter mixture over the knots and let it melt.

Leave a Reply