
Introduction to Okonomiyaki Recipe
Discovering the Joy of Homemade Okonomiyaki
If you’re looking to bring a little taste of Japan into your kitchen, the Okonomiyaki recipe is where your culinary adventure begins. This deliciously versatile dish hails from Osaka, often referred to as a savory pancake loaded with toppings that cater to every palate. Whether you like it meaty, veggie-packed, or a mix of both, okonomiyaki allows you to customize it just the way you like!
In just about 40 minutes, you can whip up a satisfying meal that’s perfect for cozy dinners or social gatherings. Not only is this dish a great conversation starter, but it's also a wonderful opportunity to experiment with flavors and ingredients. Did you know that the word "okonomi" means "what you like" in Japanese? That’s right; it’s all about personal preferences!
To dive deeper into the enchanting world of okonomiyaki, check out resources like Japan Centre for authentic tips and ideas. So, grab your apron, gather your ingredients, and let’s create something delicious!

Ingredients for Okonomiyaki
Creating the perfect Okonomiyaki starts with a solid foundation, and that’s where the base batter comes in. A mix of flour, seasonings, and a special ingredient makes it truly unique!
Essential Ingredients for the Base Batter
- All-Purpose Flour: 1 cup is all you need for a great texture. Ensure you weigh your flour for accuracy.
- Nagaimo (Mountain Yam): This adds a delightful silkiness. Around 5.6 oz will do the trick.
- Dashi: Use ¾ cup of this savory Japanese soup stock for depth of flavor.
Tasty Additions for Your Okonomiyaki
Feel free to express yourself with delicious mix-ins! Here are some popular options:
- Cabbage: Around ½ head will give that crunch we love.
- Pickled Red Ginger: Just ¼ cup adds aromatic notes.
- Protein Choices: Opt for sliced Beef, Turkey Bacon, or even vegetables like mushrooms for a vegetarian twist.
- Eggs: Four large ones bind everything together beautifully.
- Tenkasu (Tempura Scraps): A ½ cup adds texture and crunch.
With these ingredients, your Okonomiyaki Recipe is off to a great start! If you want to dive deeper, check out justonecookbook.com for tips on variations!
Step-by-step Preparation of Okonomiyaki
Preparing the Base Batter
The first step to a mouthwatering Okonomiyaki recipe is crafting a solid base batter. In a large bowl, combine 1 cup of all-purpose flour, ¼ teaspoon of kosher salt, ¼ teaspoon of sugar, and ¼ teaspoon of baking powder. These simple ingredients lay the foundation for your savory pancake.
Next, let’s add some personality to the batter with nagaimo, or mountain yam. Peel and grate about 5.6 oz (2–3 inches) of this unique root, which can add a delightful texture to your dish. It can be a bit slippery, so take care while grating! After grating, combine it with ¾ cup of dashi, a traditional Japanese soup stock, and stir well. Allow your batter to rest to enhance its flavor and texture—ideally, for at least an hour or even overnight.
Preparing the Ingredients
While your batter is resting, it’s time to prepare the toppings that will make your Okonomiyaki special. Start by discarding the core of ½ head of green cabbage and cutting it into ½-inch slices. Mince those strips and wash them thoroughly, draining any excess moisture (using a salad spinner is perfect for this!). You'll also want to chop ¼ cup of pickled red ginger and cut ½ lb of sliced turkey bacon into manageable 4-inch pieces.
Mixing the Okonomiyaki Batter
When your batter has rested, it’s mixing time! In your bowl, add 4 large eggs, ½ cup of tenkasu (or tempura scraps), and two-thirds of the pickled red ginger you prepared. Mix everything gently but thoroughly. Now, introduce the minced cabbage gradually, making sure it’s well-coated in the batter. You might not need all the cabbage—feel free to adjust based on your preference!
Cooking the Okonomiyaki
Get ready for the fun part—cooking! Heat a bit of neutral oil in your griddle or frying pans over medium heat. When the oil is shimmering, pour in a portion of the batter to create a circle about 6 inches in diameter. Top each pancake with the cut turkey bacon and cover the pan. Cooking on medium-low for about 5 minutes allows the bottom to get perfectly browned. Flip carefully and press gently to maintain their shape, then cover again for another 5 minutes.
Making the Quick Okonomiyaki Sauce
To elevate your dish, consider making a quick okonomiyaki sauce. Blend together 3 tablespoons of sugar, ¼ cup of oyster sauce, ½ cup of ketchup, and 7 tablespoons of Worcestershire sauce. This easy sauce adds a sweet and tangy finish to your pancakes.
Serving Your Delicious Creation
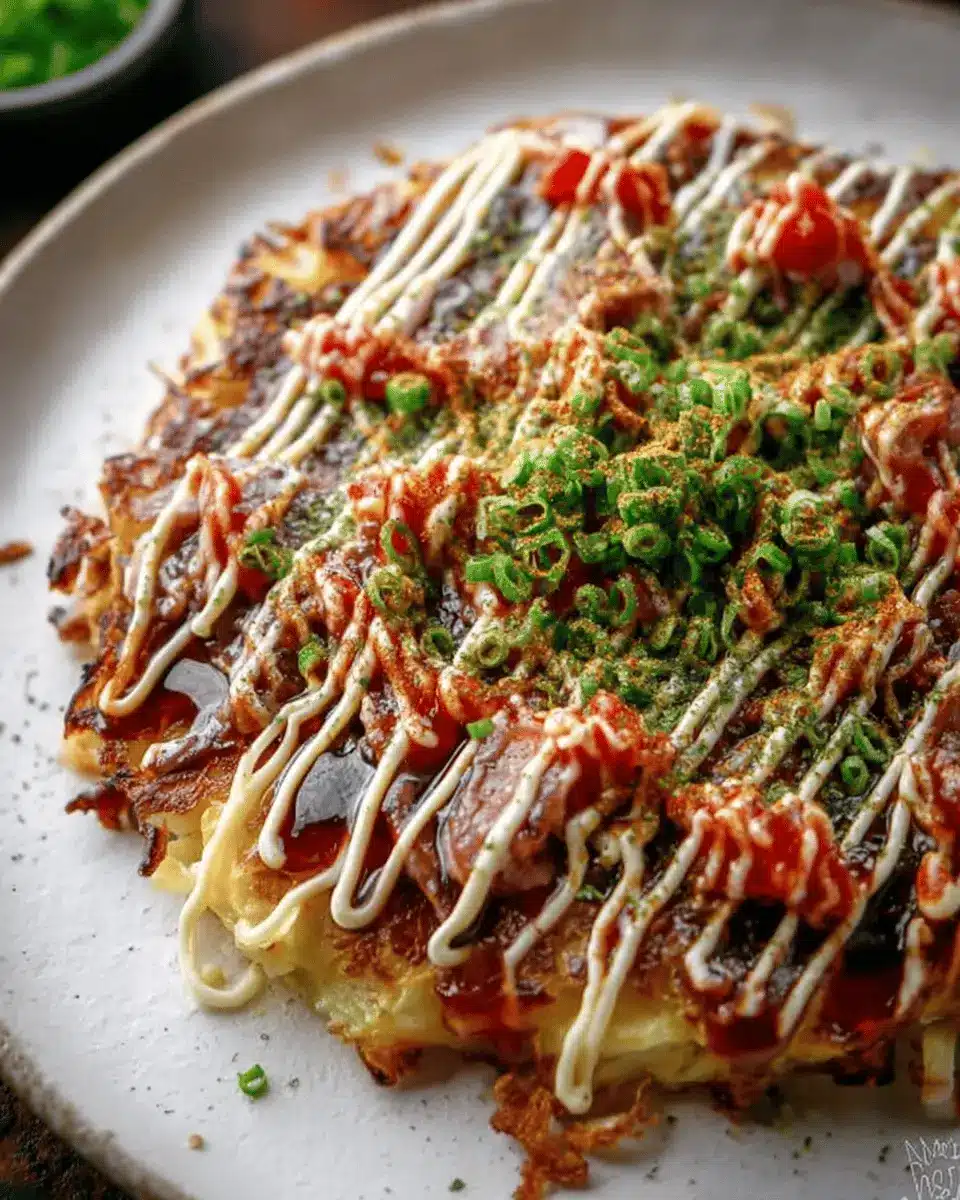
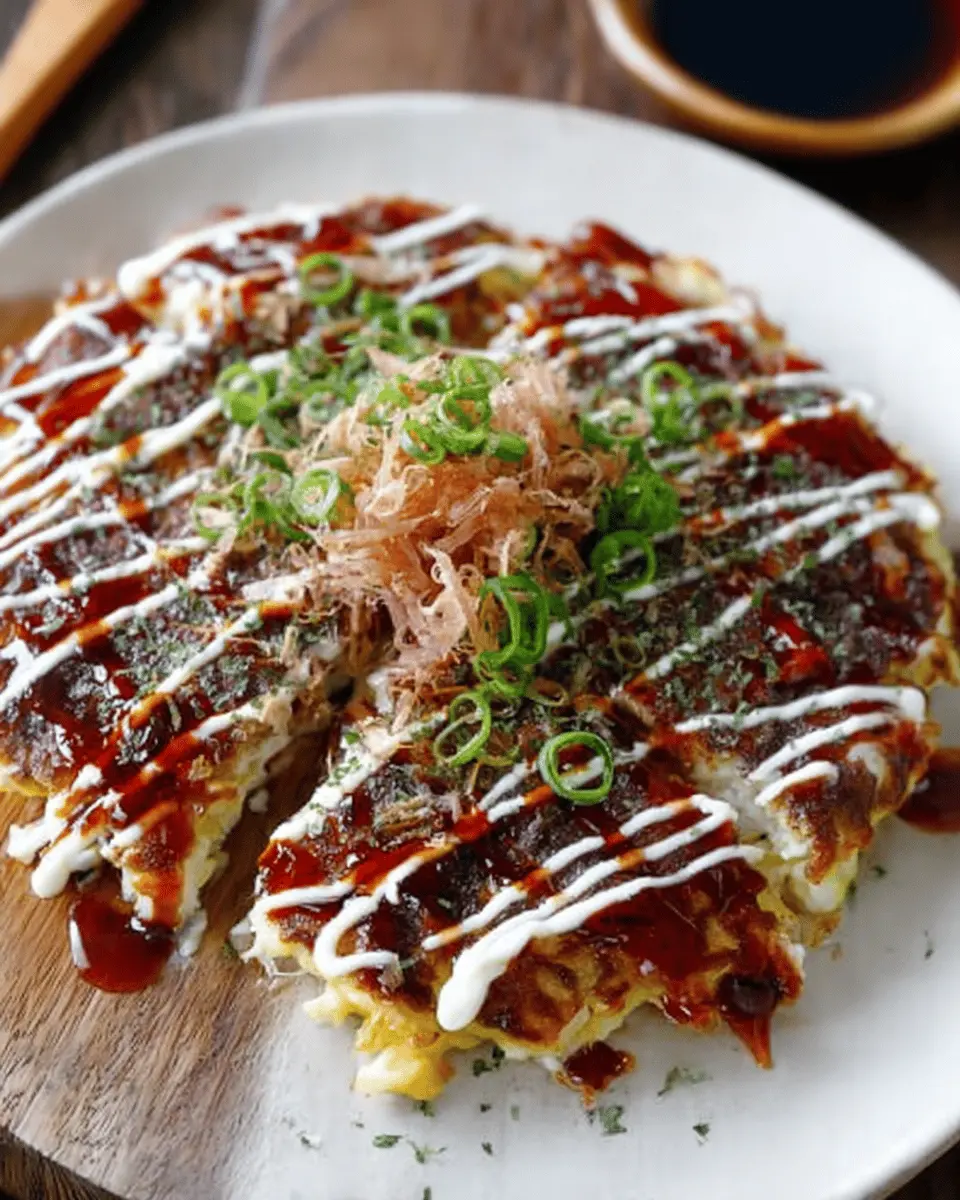
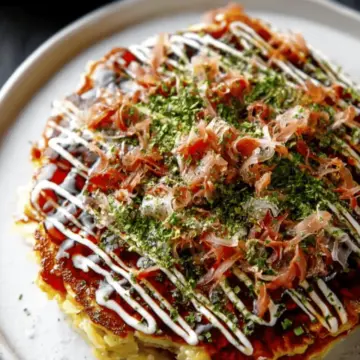
It’s time to serve your homemade Okonomiyaki! Begin by generously coating each pancake with okonomiyaki sauce. Then, drizzle with Japanese Kewpie mayonnaise in a zigzag pattern. Top with katsuobushi (dried bonito flakes), aonori (dried seaweed), and chopped green onions. Garnish with the remaining pickled red ginger for a pop of color and flavor.
Enjoy your homemade Okonomiyaki with friends and family, and don’t forget to have fun customizing each pancake to individual tastes! If you’re intrigued by the deliciousness of this dish, you might also want to explore traditional Japanese cooking blogs for more inspiration.
Variations of Okonomiyaki
Seafood Okonomiyaki
For a seafood twist, try adding shrimp, squid, or even octopus to your okonomiyaki recipe. The briny flavors of the ocean blend beautifully with the savory batter, bringing a delightful umami kick. Consider topping it with a squeeze of lemon for a refreshing zest. This variation not only looks stunning with its colorful seafood but also packs in protein and omega-3s, making it a fantastic choice for seafood lovers.
Vegetarian Okonomiyaki
If you're leaning towards a plant-based option, vegetarian okonomiyaki is equally delicious! Use a medley of fresh vegetables like mushrooms, carrots, and bell peppers. You can also enhance the flavor by incorporating tofu or omitting meat entirely. Sprucing it up with creamy Kewpie mayonnaise and saving room for your favorite toppings ensures a flavor-packed experience. This variant also opens the door for creativity—what veggies will you explore today?
Each variation of okonomiyaki allows you to personalize your dish, making it a versatile staple in your kitchen.
Cooking Tips and Notes for Okonomiyaki
Secrets to Fluffy Okonomiyaki
To achieve that perfect, fluffy texture in your Okonomiyaki, let the batter rest for at least one hour, or even overnight. This helps relax the gluten, resulting in a lighter pancake. Also, don’t skimp on the nagaimo (mountain yam)! Its unique starch properties contribute to the fluffiness that makes Okonomiyaki special.
How to Avoid Common Mistakes
Avoid adding too much cabbage at once; it can overpower the batter. Instead, mix in the cabbage gradually to maintain the perfect balance. When flipping the pancake, use two spatulas for better control and avoid breaking it apart. And remember, cooking over medium-low heat ensures an even cook without burning the outside.
For more tips on cooking techniques, check out Serious Eats for expert advice on Japanese cuisine.
Serving Suggestions for Okonomiyaki
Classic Toppings to Enhance Flavor
The beauty of your Okonomiyaki recipe lies in its versatility. For an authentic experience, start with classic toppings that truly elevate flavor:
- Okonomiyaki sauce, either store-bought or homemade, creates a rich base.
- Drizzle Japanese Kewpie mayonnaise in a zigzag for that creamy touch.
- Sprinkle with katsuobushi (dried bonito flakes) that dance with heat, and aonori (dried seaweed) for an umami kick.
- Green onions and pickled red ginger add freshness and a hint of tang.
These toppings not only enhance flavor but also make your dish visually appealing!
Creative Twists on Traditional Toppings
Feeling adventurous? Experiment with creative twists on traditional toppings for a personalized flair. Here are some ideas you can try:
- Use Turkey Bacon or Chicken Ham instead of the standard meats for a healthier option.
- Top it with avocado slices or a sprinkle of sriracha for a creamy, spicy boost.
- Consider adding shredded cheese for a gooey texture or a dollop of kimchi for a punch of flavor.
The fun of making Okonomiyaki is endless! For more ideas, check out this comprehensive guide on Japanese street food. Go ahead and get creative—your taste buds will thank you!
Time Breakdown for Making Okonomiyaki
Preparation Time
To kick things off, you’ll spend about 15 minutes getting everything ready. This includes mixing your batter and prepping your ingredients, ensuring all is set for a delightful cooking session.
Cooking Time
Once you have everything prepped, the cooking takes around 25 minutes. You’ll want to pay attention here as you layer on those flavors and watch your Okonomiyaki sizzle to perfection.
Total Time
In total, you’re looking at about 40 minutes from start to finish. Perfect for a weekday dinner or a fun weekend cooking adventure! Dive into this Okonomiyaki recipe with friends for a delicious experience you won’t forget.
For more tips on preparation, check out our article on Japanese street food to explore the vibrant culture surrounding dishes like Okonomiyaki!
Nutritional Facts for Okonomiyaki
Calories
A serving of this delicious Okonomiyaki recipe contains approximately 725 calories. It’s a hearty meal that keeps you energized for the day!
Protein
You'll also find about 21 grams of protein per serving, thanks to ingredients like eggs and beef. This makes it a satisfying choice after a workout or a busy day.
Sodium
Each serving has around 643 milligrams of sodium, which isn't excessive when balanced with fresh vegetables and other wholesome ingredients. Just be mindful of additional toppings!
For more detailed nutrition information, check out resources like Healthline and USDA FoodData Central.
FAQs about Okonomiyaki
What are the best ingredients for okonomiyaki?
To create the perfect okonomiyaki, freshness is key! Essential ingredients include
- Cabbage: Fresh green cabbage adds crispness.
- Dashi: A flavorful Japanese soup stock, which enhances the base batter.
- Nagaimo: This mountain yam gives the batter a unique texture.
- Toppings: Customize with beef, shrimp, or turkey bacon, and don’t forget the essential condiments like Kewpie mayonnaise and okonomiyaki sauce. You can learn more about these ingredients at Just One Cookbook.
Can I make okonomiyaki in advance?
Absolutely! You can prepare the batter a day ahead. Just store it in the fridge to let all the flavors meld. Cooked okonomiyaki can be reheated easily, making it a great option for meal prep.
Are there gluten-free options for okonomiyaki?
Yes, you can substitute all-purpose flour with a gluten-free flour blend or rice flour, keeping in mind that it might slightly alter the texture. Always check dashi products for gluten-free labels to ensure your dish remains entirely gluten-free.
Conclusion on Okonomiyaki Recipe
In summary, this Okonomiyaki recipe offers a delicious and customizable experience for both seasoned cooks and beginners. By incorporating your favorite ingredients and toppings, you can create a unique dish that everyone will love. Enjoy your culinary adventure, and don’t hesitate to share your creations!
Okonomiyaki Recipe
Equipment
- large bowl
- griddle
- frying pans
- spatula
- ceramic grater
- salad spinner
Ingredients
For the Base Batter
- 1 cup all-purpose flour (plain flour) weigh your flour; for weights, click the Metric button; or use the 'fluff and sprinkle' method
- 0.25 teaspoon Diamond Crystal kosher salt
- 0.25 teaspoon sugar
- 0.25 teaspoon baking powder
- 5.6 oz nagaimo/yamaimo (mountain yam) 2–3 inches, 5–8 cm
- 0.75 cup dashi (Japanese soup stock) use standard Awase Dashi or Vegan Dashi
For the Okonomiyaki
- 0.5 head green cabbage large; 1.4 lb, 640 g
- 0.25 cup pickled red ginger (beni shoga or kizami beni shoga)
- 0.5 lb sliced pork belly 8 slices; substitute with shrimp, squid, or mushrooms
- 4 large eggs 50 g each w/o shell
- 0.5 cup tenkasu/agedama (tempura scraps) get from Amazon
- neutral oil for cooking the okonomiyaki
For Serving
- okonomiyaki sauce store-bought or quick homemade
- toppings of your choice typically Japanese Kewpie mayonnaise, katsuobushi, aonori, pickled red ginger, and chopped green onions/scallions
Instructions
Preparation Steps
- If time allows, let the batter rest for at least one hour (and up to overnight) for a fluffier okonomiyaki. Now, gather all the ingredients.
- In a large bowl, combine all-purpose flour, kosher salt, sugar, and baking powder. Mix all together.
- Peel and grate nagaimo/yamaimo in a small bowl. Work quickly to prevent skin irritation from the nagaimo.
- Add grated nagaimo and dashi to the bowl. Mix until combined and set aside.
- Discard the core of the green cabbage and cut into ½-inch slices, then mince. Wash and drain well.
- Chop pickled red ginger and cut sliced pork belly into 4-inch pieces.
- If the batter has rested, add eggs, tenkasu, and two-thirds of the pickled red ginger. Mix until combined.
- Add minced cabbage to the batter in thirds, mixing well before each addition.
- Check the consistency of the batter to ensure that the cabbage is coated well.
Cooking Steps
- Heat a griddle or two frying pans with a bit of neutral oil on medium heat.
- Add one portion of the batter to each pan, spreading it into a circle about 6 inches in diameter.
- Place three slices of pork belly on top of each pancake and cover, cooking for 5 minutes.
- When the bottom is browned, flip over and gently press to fix shape, cooking, covered, for another 5 minutes.
- Flip over again and cook uncovered for 2 minutes.
- Transfer cooked okonomiyaki to plates and continue with remaining batter.
Sauce and Serving
- Combine sugar, oyster sauce, ketchup, and Worcestershire sauce in a small bowl for the quick sauce.
- Customize okonomiyaki with sauce and toppings of your choice, drizzling mayonnaise in a zigzag pattern.
- Sprinkle with katsuobushi, aonori, green onions, and garnish with remaining pickled red ginger.
Storage Instructions
- Wrap each okonomiyaki in aluminum foil and store without sauce or toppings for up to 3 days in the refrigerator.
- For freezing, store in a freezer bag for up to a month.
- Reheat from refrigerator at 350°F for 10–15 minutes, or from freezer for 25–30 minutes.


Leave a Reply